Pages are the fundamental building block for the navigation and content on your website. DNN allows you to create as many Pages as you like, and Pages can be organized into Parent/Child relationship (sub-pages) to form the navigation structure of your site. A DNN Page can hold as many Modules as you like, and you can re-arrange the Modules on the page at any time by simply using your mouse. Each Page has a name, title, and some META information that you can edit to help your search engine optimization efforts with Google, Bing, and Yahoo. Pages can also be referred to as “Tabs,” but this name is being phased out in favor of the term “Page.”
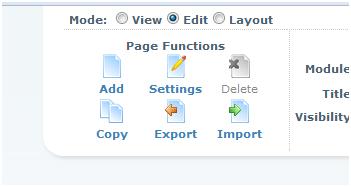
The quickest way to add a new page to your site is by clicking on the “Add” icon/link in the Page Functions area of the DNN control panel at the top of your site (once you’ve logged in).
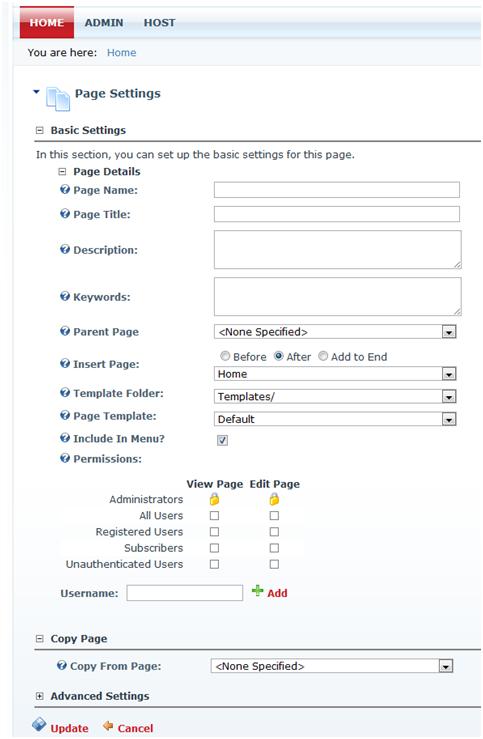
You’ll be presented with a blank “Page Settings” screen that looks something like this:
Important Fields:
| Page Name | The name of the page will be displayed in navigation menus and will also be visible in the page URL. This should only be 1-3 words. |
| Page Title | This will be displayed in the browser title bar and is also important for SEO (Search Engine Optimization). This can be longer and more descriptive than the Page Name. |
| Description | The META Description is not seen by visitors to this page, but is used by search engines to rank the relevancy of this page. This should be a few sentences describing the content on this page. |
| Keywords | The META Keywords are not seen by visitors to this page but are used by some search engines to determine what your page is about. This should be a list of keywords (phrases) separated by commas that describe the content on this page. |
| Parent Page | To make this Page a “sub-page” of another Page, select the parent Page from the drop-down list. Selecting the default “<None Specified>” would make this Page appear in the top-level navigation menu for your site. |
| Include in Menu? | This checkbox allows you to hide this page. If you uncheck this box then the page will not be shown in the navigation menu. A “hidden” page can still be viewed by clicking on a link to this page, or by typing the URL of the page into the browser address bar. |
| Permissions | This area controls who can view and/or edit this page and its content. By default, only Administrators can view and edit this page. To make the page visible to all visitors to your site, check the “All Users” box in the “View Page” column. Once you have done so, it will turn into a green check mark. |
Once you have entered the page name, title, and other details, scroll down and click on the “Update” icon/link to save your new page!
Editing Pages
The quickest way to edit an existing Page is to navigate to the Page in your browser, and then click on the “Settings” icon/link in the Page Functions area of the DNN control panel at the top of your site.
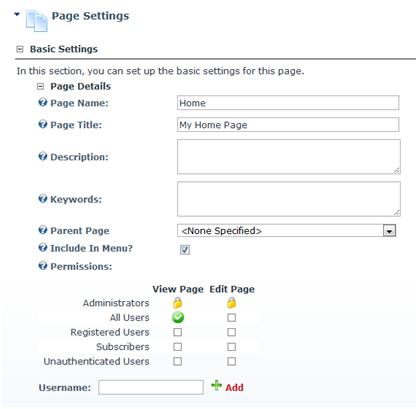
You will see a screen similar to the one below. Once you have made your desired changes, scroll to the bottom of the screen and click on the “Update” icon/link to save your changes.
Changing Page Order in the Navigation Menu
You can change the order of pages in the site navigation menu at any time. As an example, take a look at the screenshot below of our current navigation menu:

As you can see we have 3 pages (Home, About Us, Contact Us). Here’s how we can change the order so that the “Contact Us” page appears immediately following “Home.”
1. Go to the Admin Dashboard by clicking on the “Admin” link in the upper-right of your DNN Control Panel.
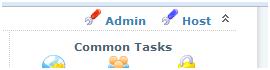
2. Click on “Pages” icon/link.
![]()
3. Click on the page we want to move – In this case, it’s “Contact Us.”
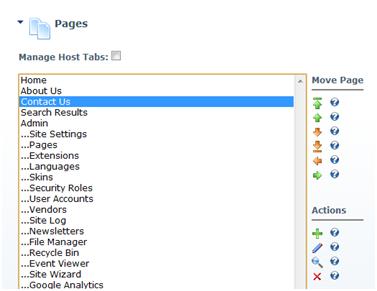
4. Click on the up or down arrow icon to move the page up or down. We want to move our “Contact Us” page up in the list, so that it appears before “About Us” in the navigation. To do so, we’ll click on the green “up” arrow (second from the top) underneath the “Move Page” heading. The other arrows here will move the page to the top, bottom, up, or down. You can hover your mouse cursor over the icon to see a description of what that icon does.

We can see that our page has been moved up in the list and our site navigation has also been updated automatically!
Additional Page Settings
| Icons | Every page can have an image linked to it that would allow it to show up with the menu item or drop down. This can help make more attractive or intuitive navigation. |
| Page Skin / Container | The default design that is used on your page is controlled in the Admin > Site Settings area of the DNN website. However, you can override any skin/design on any single page. Some sites have a skin for the homepage and then a skin used for all the inner pages. Changing the container will alter the look and feel that surrounds each module. You can then override that if necessary with the individual module settings. |
| Disabled | Making a page disabled will not allow the user to click the link. This is sometimes used with drop down menus when you don’t want the top most link to be selectable. |
| Refresh Interval | Want the page to automatically reload every 60 seconds? Type 60 into the text box. |
| Page Header Tags | Add additional header tags to include CSS, JavaScript, or other custom header tags. |
| Secure | If you have an SSL certificate on your website and you have this checkbox checked, it will automatically switch this page to https when loaded. To get this to work properly you must also change a setting in Admin > Site Settings called SSL Enabled & SSL Enforced |
| Sitemap Priority | This is the value used when DNN automatically generates an XML sitemap that can be seen at sitemap.aspx. |
| Start Date / End Date | Want this page to automatically show up in your navigation or automatically be removed at a certain date? Use these features to control the start and expiration of your content. |
| Link URL | Not all pages have to be physical pages on your website that have modules on them. Some pages can be designed to just be navigation elements. Using the Link URL feature you can select:
· None: which makes the page behave like a normal page · URL: which allows you to link the navigation item to another URL, even on a completely different website · Page: allows you to conveniently link a menu item to another page on your website · File: allows you to have a file load when a certain menu item is selected |
| Permanently Redirect | If this page previously existed but you then moved it and are keeping this link just to redirect users select this checkbox. This will tell the search engines that the current page has been permanently moved to the new link that it is about to send the user/search engine to. |