The Rich Text Editor is used in many of the DotNetNuke Modules and gives you the ability The Rich Text Editor is used in many of the DotNetNuke Modules and gives you the ability to edit text and HTML in a very simple and straightforward manner. The HTML module is the most straightforward example of the Rich Text Editor.
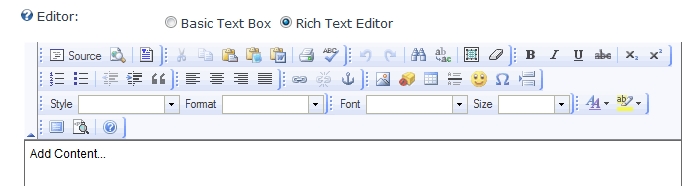
Source Option
The source icon allows you to switch between a “what you see is what you get” WYSIWYG editor and a way to interact with the raw HTML code. All the Rich Text Editor is doing is making it easier to generate HTML code, but hopefully you won’t have to venture into the Source view.
Preview Icon
The Preview Icon is an easy way to see what the content of your module will look like when it is saved. This is sometimes not entirely accurate. I find that saving it and then viewing it is the best option.
Templates
The Rich Text Editor comes with a couple pre-made templates to control formatting. You usually do not need to use these, but occasionally you may want to create a custom Template to enforce a particular style or format to be used for areas of your website.
Cut, Copy & Paste
Cut, Copy, and Paste are going to work how you might imagine. It allows you to remove and copy items and save them to your clipboard. However, there are some icons that are designated specifically for pasting content from Word. If you have a lot of Word content, use the ‘Paste from Word’ Icon to paste your Word code into the popup. Then you will usually check the Remove Style Definitions and paste your content into the textbox. When you click OK, it will then try to remove the formatting from your Word document and format it to fit with your website. Images from your word document will not get copied over.
Print Icon
The Print icon will allow you to print just the content that you are working on.
Spell Check
Spell check has to be run by you, it is not automatic. As a general tip I would recommend using Mozilla FireFox for editing your website. It has a very subtle built in spell check that will underline words that are miss-typed.
Undo / Redo
Undo and Redo are easy icons to fix something you may have done in the editor. You can also use CTRL Z to undo an action. If you were editing something and you ever mess it up a lot, you can always not save it and then just go re-edit it.
Find, Find& Replace
Find is an easy way to locate text in the editor while Find and Replace makes it easy to do a massive find and replace of a word or phrase.
Select All
The select all icon will highlight everything in the editor. If your cursor is in the editor you can also use CTRL A on your keyboard.
Remove Formatting
If you have pasted content from Word and it still looks odd, or you have a bunch of font colors and sizing that you do not like you can use the remove formatting option. First use the select all button to highlight all the text, then click remove formatting to have the editor attempt to clean up the code as much as possible.
Bold, Italics, Underline, Strike, Subscript, Superscript
These are all pretty standard word processing features, allowing you to format some of your text.
Lists – Numbered & Bulleted
Selecting this will add a bullet point to the line you are on; if you hit enter at the end of the line it will then start another bullet point. If you hit enter twice it will drop down to a new line and end your bulleted list.
Decrease Indent & Increase Indent
This is a convenient way to indent content on your website. Often times the space bar can fulfill this need as well.
Blockquote
Block quote is another way to accomplish an indent. It is usually used to quote content from another source.
Justify – Left, Center, Right, Block
Using the justify option you can easily align text to the left, center, or right or use block justification.
Link
You can easily link photos or text that you can see in the editor. Highlight or click the item you want to link. After it is highlighted, select the chain icon. There are 3 link types: URL, link to an anchor, or link to an email address. Usually you will use the URL option. You can type in a URL or paste in a link. If you want to link to a page or file on your site, click “Browse Server.”
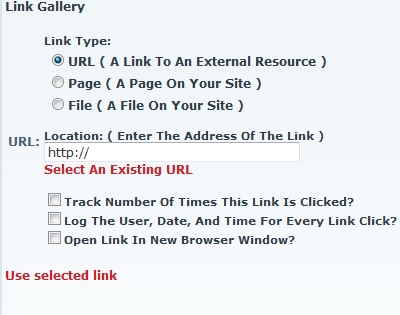
URL is the default when browsing, but you can still paste in a link. If you select Page, a drop down will then appear that shows you all of the pages on that website. Selecting File will show a drop down to select a folder and also a drop down that shows all the documents in each of the folders. Use the Upload New File to use this screen to upload a PDF, Image, or other document type. DNN has the ability to do some link tracking if you want DNN to use the link click options.
Use selected link to setup the link, after that click OK, and it will add it to the editor. You can also switch to the Target tab and select “New Window” if you want the file or link to open in a new window.
Un-Link
Highlight any item that is linked and click the unlink option to remove the link.
Anchors
One option that I did not review above in the Link section was the “link to anchor” option. A common use for something like this is to have a lot of links at the top of a page that will jump you down to the section on the page after you click on it. Use the anchors to tag areas throughout the page. Once you have added the anchors, go to the top of the editor window and you can then make links. Now link them to the anchors. When the user clicks on it, it just links them to the location of the anchor on the page.
Pictures
Select the picture icon to add a picture within the editor. After you select the icon you will usually select the “Browse Server” option next. Now you will be looking at the Root file area. From here you can browse to other folders, create folders, or upload a photo to the server.
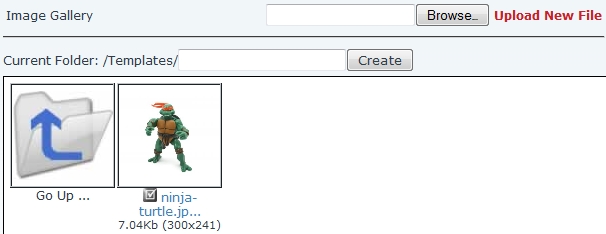
Use Browse to find the image on your local machine, then Upload New File to add the image to the server. Select the image you want to add to the page.
Then you can use the option to align photos or use the width and height features to resize the image. It is definitely recommend that you resize the photo on your computer before uploading the image. Resizing the editor is not a true resize, so large images can still take a long time to load using this technique.
Flash Embed
Use the flash embed icon to embed a SWF file from your server or another server.
Tables
The table icon will allow you to create tables within your editor. Set the rows, columns as well as the width of your table. Use tables for tabular data or to help put items next to each other on the same line.
Horizontal Rule
This is an easy way to put a line across your page to separate content.
Smiley Faces
The editor comes with a couple easy to use emoticons.
Special Characters
Use the special character option to add characters to your document that you might not be able to normally find on your keyboard.
Page Break
This is a feature that helps primarily with printing. If documents are breaking in weird spots when printing, you can use this feature to help improve that.
Style
The style drop down menu has a set of pre-defined styles that can be used within your text.
Format
The format option is actually pretty important. If you want to add headings in your document, it is better to use the Format option Heading 1, Heading 2 etc. versus using the font size. This creates a more uniform look and will fit with your design better.
Font & Size
Change the font and size of your text using two drop down menus.
Text Color & Background Color
The text color will allow you to change the color of the actual text while using the background color will put a color behind your text.
Maximize Editor
If you are feeling too confined, you can use the maximize option to view the editor in full screen.
Show Blocks
The show blocks option will put a dashed border around all block level items such as Paragraph and Div tags.