Control Panel

Modes
There are three modes: View, Edit and Layout. The mode controls how you will see the page and interact with modules. The default mode is “Edit”, this gives you the ability to interact with all features of the site and modules on the page. If you switch to “View” the page will change to show you a more realistic view of how a normal visitor would see the website. The “View” option keeps the control panel at the top of the screen but all of the module edit options are hidden. The “Layout” mode hides the content of each of the modules on the page and is designed primarily to make it convenient for you to see the Panes and the Modules in each Pane. This view is designed to move Modules around on a given page.
What is a Page?
A page is essentially a menu item on the website. Each DNN Website will start with a Home page. You will use the control panel to add new pages to the website. Smaller marketing websites will often have pages such as:
- Home
- About
- Services
- Products
- News
- Contact Us
These are all “Pages” on your website. In some manuals and documentation they are also referred to as “Tabs”.
What is a Module?
Pages are blank shells that get their functionality from Modules. Without any Modules on a page, the page will have very limited functionality. To display something as simple as text content you must add a module to the page. The most common module is the HTML module, which gives you the ability to add text and images to your pages and design/format them with an easy to use editor. This editor will be familiar to you if you’ve ever used Microsoft Word or other similar word processing programs.
If you wanted to have a page where users could login to the website, view and read a blog, and also list some documents or files to download you would:
1. Use the control panel to select Module: Account Login
Enter a Title that will be displayed above the module then select ‘Add Module To Page’
2. Use the control panel to select Module: Blog
Give it a name such as “My Websites Blog” and then add that module to the page.
3. Use the control panel to add the Documents module to the page

You can see the Documents module has the “Add New Document” option. Different modules will have different features and ways to interact with them.

Additional options and settings exist for each module by rolling over the blue/black arrow above the module.
Each Module has a “Settings” area that controls various features and functions for that module. The Documents Module settings allow you to control which fields are shown and in what order the documents are displayed. Ever module will have a common set of settings and usually some additional settings that are specific to that module.
When adding modules to a page there is an option to choose a “Pane” for the module. Modules are placed into Panes, and modules can be moved between Panes on your site.
What is a Pane?
Panes are the areas on your page that you can add Modules. Every page will have a default Pane named “ContentPane” and if you do not select a Pane when adding a module to the page then this is where the module will go. To get a better idea of the available Panes on a particular page, use your control panel to switch your Viewing Mode to ”Layout.”
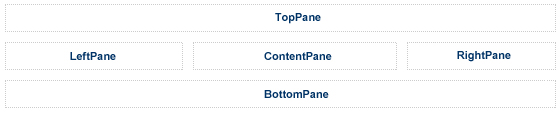
This particular website has five panes: TopPane, LeftPane, ContentPane, RightPane and BottomPane.
You could add the Account Login module to the LeftPane, your Blog module to the ContentPane and your documents module to the RightPane. Your page would then have the account login on the left, blog in the middle and document downloads on the right.
After you have added a module to a page you can easily move it to another pane by rolling over the blue/black arrow icon above the module (This menu is called the module actions menu). When the menu for that module is displayed, move your cursor to the “Move” option, then you will be able to select which Pane you want to move the module to and also move the module above or below other modules in that Pane.