Beacons are small physical devices that broadcast wireless signals to mobile apps which can then react accordingly. In short, your mobile app will know when your phone moves closer to or further away from a beacon that is stuck on a wall (or anywhere else).
The term “beacon” is commonly used to refer to both the physical device itself as well as the technology standard and protocol that is used to communicate with them.
Beacons explained in 3 points
- Each beacon transmits tiny wireless signals using a Bluetooth Low Energy (BLE) radio.
- Smartphones are constantly scanning for these beacon signals. If your phone detects a nearby signal it can launch an app on your phone that responds accordingly.
- Apps can display content relevant to your physical location, or update a display on the wall. For example, when you walk into a restaurant your phone could automatically display the current drink specials. Or, if you walk near a product in a store your phone could trigger a display on the wall to show you more detailed product information.
![]()
A beacon next to an iPhone 5s
Support for beacon technology is built-in to both iOS and Android. The “iBeacon” name was coined by Apple (but is also supported on Android) and Google is backing the “Eddystone” variation, but both are really just brand names for the underlying Bluetooth Low Energy (BLE) protocol used for communication. There are technical differences between iBeacon and Eddystone, but for the most part they operate the same way and both can be supported in a single app.
Hands-On Example of Beacons
Let’s build a quick iOS mobile app that can “listen” for a beacon and display basic information like in/out of range and approximate distance from the beacon. These are the basic building blocks you’ll need to build a more full-featured mobile app.
Here’s what it will look like when we’re done:
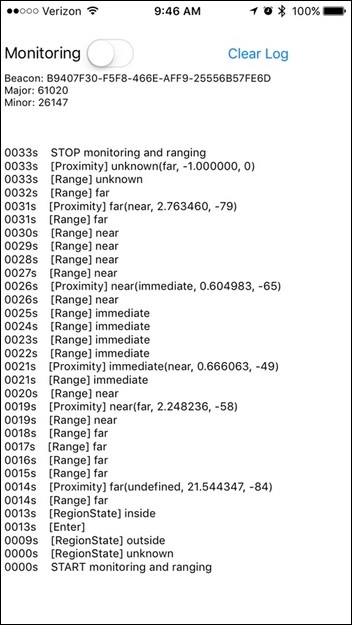
Our completed demo app on iOS
If you’d like to download the completed app, you can grab it from Github, otherwise, read on!
Requirements
- At least 1 Beacon. Estimote beacons are very popular, and that’s what we’ll be using in this example.
- An iOS device that supports Bluetooth 4.0 (iPhone 4S or later, iPad 3rd-gen or later).
- Recent version of Appcelerator Titanium SDK (5.5.1 as of this writing) and Appcelerator Studio.
- Laptop with recent version of Mac OSX and Xcode installed
Create a new Titanium Alloy app
$ appc new -t titanium
Replace your index.xml with
<Alloy>

<Window class="container" layout="vertical" top="40">

<View layout="horizontal" height="35" width="98%">

<Label>Monitoring</Label>

<Switch id="monitoringSwitch" left="4" value="false" onChange="toggleMonitoring"/>

<Button left="100" onClick="clearLog">Clear Log</Button>
</View>

<View layout="horizontal" height="SIZE" width="98%">

<Label id="beaconLabel"></Label>

</View>

<ScrollView width="98%" height="FILL" backgroundColor="white">

<Label id="label" width="FILL" height="SIZE"></Label>

</ScrollView>

</Window>

</Alloy>
Replace your index.tss with
".container": {

backgroundColor:"white"

}

"Label": {

width: Ti.UI.SIZE,

height: Ti.UI.SIZE,

color: "#000"

}

"#label": {

font: {

fontSize: 12

}

}

"#beaconLabel": {

width: Ti.UI.FILL,

height: Ti.UI.SIZE,

font: {

fontSize: 11

}

}
Replace your index.js with
var TiBeacons = require('org.beuckman.tibeacons');

$.beaconLabel.text = "Beacon: " + Alloy.CFG.beacon.uuid + "\nMajor: " + Alloy.CFG.beacon.major + "\nMinor: " + Alloy.CFG.beacon.minor;

$.label.text = "Flip the switch to start monitoring for the Beacon";

monitorStartTimestamp = null;

Ti.Geolocation.requestLocationPermissions(Ti.Geolocation.AUTHORIZATION_ALWAYS);

function onEnterRegion(e) {

Ti.API.info('ENTER region: ' + JSON.stringify(e));

print('[Enter]');

TiBeacons.startRangingForBeacons(e);

}

function onExitRegion(e) {

Ti.API.info('EXIT region: ' + JSON.stringify(e));

print('[Exit]');

TiBeacons.stopRangingForBeacons(e);

}

function onDeterminedRegionState(e) {

Ti.API.info('DETERMINED region: ' + JSON.stringify(e));

print("[RegionState] " + e.regionState);

}

function onBeaconRanges(e) {

Ti.API.info('RANGES: ' + JSON.stringify(e));

if(e.beacons && (e.beacons.length > 0)) {

print('[Range] ' + e.beacons[0].proximity);

}

}

function onBeaconProximity(e) {

Ti.API.info('PROXIMITY: ' + JSON.stringify(e));

print('[Proximity] ' + e.proximity + "(" + e.fromProximity + ", " + e.accuracy + ", " + e.rssi + ")");

}

function toggleMonitoring() {

if ($.monitoringSwitch.value) {

monitorStartTimestamp = new Date();

print("START monitoring and ranging");

TiBeacons.startMonitoringForRegion({

notifyEntryStateOnDisplay: "YES",

uuid: Alloy.CFG.beacon.uuid,

major: Alloy.CFG.beacon.major,

minor: Alloy.CFG.beacon.minor,

identifier: "Estimote"

});

} else {

print("STOP monitoring and ranging");

TiBeacons.stopMonitoringAllRegions();

TiBeacons.stopRangingForAllBeacons();

}

}

function clearLog() {

$.label.text = "";

}

function print(s) {

var now = new Date();

var secondsPassed = ((now - monitorStartTimestamp) / 1000);

var padding = "0000";

$.label.text = (padding + Math.round(secondsPassed)).slice(-padding.length) + "s " + (s + "\n") + $.label.text;

}

TiBeacons.addEventListener('bluetoothStatus', function(e){

Ti.API.info('bluetoothStatus = ' + JSON.stringify(e));

});

TiBeacons.addEventListener("enteredRegion", onEnterRegion);

TiBeacons.addEventListener("exitedRegion", onExitRegion);

TiBeacons.addEventListener("determinedRegionState", onDeterminedRegionState);

TiBeacons.addEventListener("beaconRanges", onBeaconRanges);

TiBeacons.addEventListener("beaconProximity", onBeaconProximity);

TiBeacons.requestBluetoothStatus();

$.index.open();

if (!Ti.Geolocation.locationServicesEnabled) {

alert('Please enable location services');

}
Update your config.json
For our demo we’ll only be concerned with monitoring a single beacon. Edit your config.json file and enter the details of your beacon’s UUID, major and minor versions. If you’re using Estimote beacons you can find this information using the Estimote mobile app, or by logging into your account at https://cloud.estimote.com.
"global": {

"beacon": {

"uuid": "B9407F30-F5F8-466E-AFF9-25556B57FE6D",

"major": 61020,

"minor": 26147

}

}
Download and install the TiBeacons module into your titanim project
The TiBeacons module provides the bridge between Titanium and the underlying beacon framework in iOS.
Download the ZIP and extract it into your project’s modules folder.
Update your tiapp.xml file
We need to add a reference to the TiBeacons module:
<modules>

<module platform="iphone">org.beuckman.tibeacons</module>

</modules>
We also need to add a few things to allow our app to use location services in iOS:
<ios>

<plist>

<dict>

<key>UIBackgroundModes</key>

<array>

<string>location</string>

<string>bluetooth-central</string>

</array>

<key>NSLocationAlwaysUsageDescription</key>

<string>

We use low-energy Bluetooth and iBeacons devices to provide relevant information to you.

</string>

</dict>

</plist>

</ios>
Deploy to your iOS device
You’ll need a real device to test this app, since beacons can’t be tested using the iOS simulator at the moment. This means you’ll need a valid Apple Developer account, certificate, and provisioning profile with your device’s UUID.
Assuming you have all the certs and profiles in order, connect your phone and deploy the app using Appcelerator Studio.
As you walk around you should see the screen update frequently with the status of your beacon. It will show enter/exit events when you go in and out of range of the beacon. As you move around you should see the range change between unknown, far, near, and immediate.
NOTE: It can take up to 30 seconds for your phone to recognize that you are “out of range” of a beacon (and display the “exit” event). This is due to the beacon protocol itself, and cannot be adjusted. It’s done this way to prevent false-positives (e.g. if the beacon signal is temporarily blocked but you are still in range)
Further Reading
Estimote has a ton of great information on their site. You can also buy beacons from them, download their SDKs, and read more about beacon technology in general and how it can be used.
Google’s Eddystone (open beacon format)
Bluetooth low energy beacons (Wikipedia)